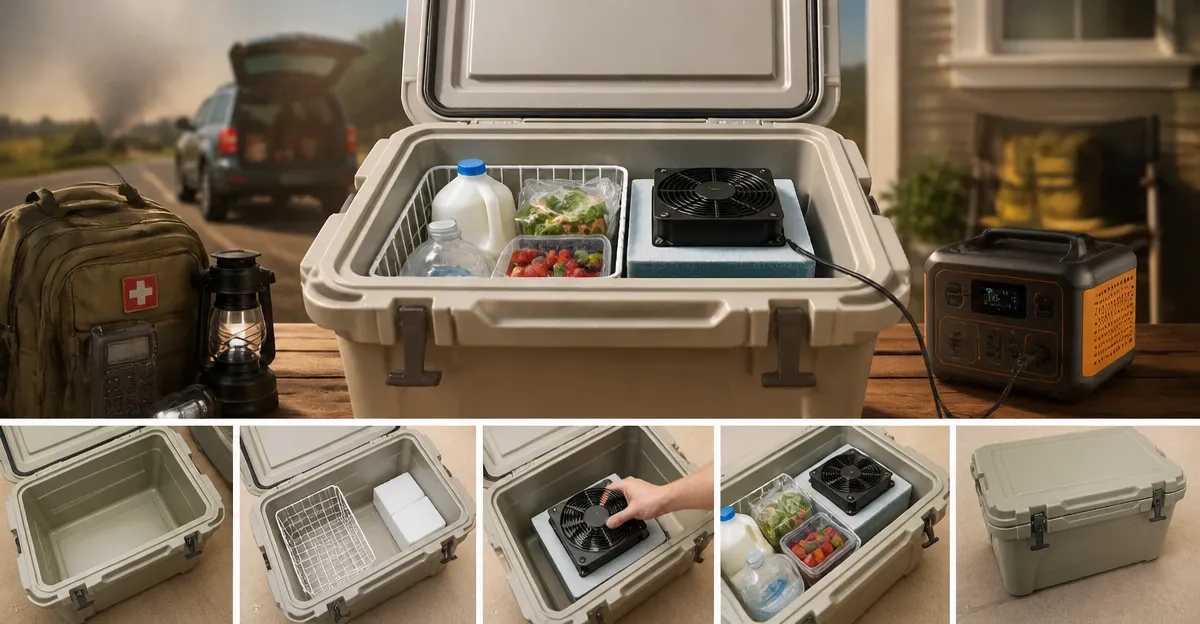
How to Convert a Cooler into a Temporary Fridge for Evacuations — YETI vs Coleman vs Engel (Step‑by‑Step)
When a natural disaster forces an evacuation, having a portable refrigeration solution can preserve medication, perishable food, and essential beverages. This guide explains how to transform a conventional cooler into a temporary fridge that can operate on battery power or a generator. By following the outlined steps, one can achieve reliable cooling for up to five days, even in high ambient temperatures. The instructions integrate real‑world product data to ensure each tool is selected for performance, durability, and cost‑effectiveness.
Readers will discover how to select the appropriate cooler, enhance its insulation, integrate a power source, and configure temperature monitoring. The process does not require specialized HVAC knowledge; it relies on readily available camping gear and a compact 12 V refrigerator. The guide also compares the strengths of popular brands such as Coleman, Titan, and EUHOMY, allowing one to make an informed purchase decision. Ultimately, the result is a mobile cold‑storage unit ready for any evacuation scenario.
What You’ll Need
- Titan Zipperless Hard Cooler – $58.32, 4.6★ (57,046 reviews)
- Coleman Chiller Cooler – $25.98, 4.6★ (16,833 reviews)
- Coleman Xtreme Rolling Cooler – $74.99, 4.5★ (20,537 reviews)
- Coleman Classic Series Cooler – $54.99, 4.5★ (5,375 reviews)
- EUHOMY 19QT Car Fridge – $149.99, 4.5★ (2,455 reviews)
- Heavy‑duty insulated foam board or Reflectix sheets
- Silicone‑based sealant
- Thermometer (digital, with probe)
- Portable power source (car battery, solar panel, or generator)
- Extension cord and 12 V DC adapter (included with EUHOMY unit)
Step 1 – Choose the Base Cooler
The first decision is the cooler that will serve as the structural shell. For short‑term evacuations where weight and portability matter, the Coleman Chiller Cooler offers a lightweight, 9‑qt option that fits comfortably in a car trunk. Its TempLock foam insulation maintains cold temperatures for 24 hours, making it an excellent foundation for a temporary fridge.
If additional capacity is required—such as storing multiple meals, medication, and a family’s beverage supply—the Coleman Xtreme Rolling Cooler provides 84‑can capacity and five‑day ice retention. The rolling wheels simplify relocation, and the lid can double as a seat, which is useful in a shelter setting.
Both coolers feature leak‑proof lids and sturdy construction, but the Xtreme’s double‑wall insulation gives a measurable advantage in extreme heat. The price difference ($74.99 vs $25.98) reflects the larger volume and enhanced thermal performance.
For users who already own a mid‑size cooler, the Titan Zipperless Hard Cooler is a versatile alternative. Its patented zipperless lid provides rapid access, and the removable SmartShelf separates soft foods from ice, reducing the risk of soggy supplies during prolonged power outages.
Step 2 – Reinforce Insulation
While the chosen cooler already includes foam insulation, augmenting it with reflective insulation can extend cooling duration. Cut Reflectix or a similar foil‑backed foam board to fit the interior walls of the cooler. Secure the panels with silicone‑based sealant, ensuring a tight seal around edges and corners. This extra layer reflects radiant heat, complementing the cooler’s existing Deep Freeze Performance Insulation (as found in the Titan model).
When using the Coleman Classic Series Cooler, the high‑capacity 80‑can design already incorporates a thick liner, but the additional reflective layer can still add a 12‑hour buffer in temperatures above 90 °F. The Classic’s recessed lid lip also facilitates placement of the insulation without interfering with the lid’s seal.
After installation, allow the sealant to cure for at least four hours before proceeding. This step prevents air leaks that could compromise the fridge’s efficiency. The process is straightforward and does not require specialized tools beyond a utility knife and a caulking gun.
Step 3 – Integrate the 12 V Refrigerator
The core of a temporary fridge is an active cooling unit. The EUHOMY 19QT Car Fridge offers a compact compressor‑based system capable of reaching -4 °F in 15 minutes while consuming only 45 W. Place the fridge on a stable platform inside the cooler, preferably on the bottom shelf to keep the cold air stratified.
Connect the EUHOMY unit to the vehicle’s 12 V outlet using the included adapter. For longer evacuations without a running engine, a portable solar panel or a small inverter connected to a deep‑cycle battery can supply power. The fridge’s app control allows remote temperature adjustments, which is valuable when the unit is hidden beneath a blanket of ice.
Because the EUHOMY fridge includes a magnetic sealing lid, it creates a secondary barrier against warm air infiltration. This dual‑seal design works synergistically with the cooler’s primary lid, effectively creating a “cooling chamber within a cooling chamber.” The magnetic seal also simplifies frequent opening without degrading the gasket.
When using the Titan Zipperless Hard Cooler, the removable hard‑body liner can be taken out, allowing the EUHOMY fridge to sit directly on the outer shell. This configuration maximizes internal volume for ice packs and perishable goods.
Step 4 – Optimize Ice Pack Placement
Ice packs remain a low‑tech, high‑impact method for extending cooling time. Position a large rectangular ice pack at the rear of the cooler, where the cold air will settle and flow upward. The Titan’s SmartShelf can hold the ice pack while keeping food items above it, preventing sogginess.
For the Coleman Xtreme Rolling Cooler, the built‑in drain allows melted ice water to be removed without tilting the unit. Use the drain after each 24‑hour period to keep the interior dry, which improves the EUHOMY fridge’s efficiency.
When space permits, add a secondary ice pack on the opposite side of the fridge to create a “thermal sandwich.” This arrangement reduces temperature gradients and ensures that the fridge’s compressor does not have to work as hard, conserving battery life.
Remember to pre‑freeze ice packs at least 24 hours before evacuation. In emergency kits, store a spare set of frozen gel packs in a freezer compartment of a vehicle or a home freezer.
Step 5 – Install Temperature Monitoring
A digital thermometer with a probe provides real‑time feedback on internal temperature. Place the probe near the EUHOMY fridge’s evaporator coil for the most accurate reading. Monitor the temperature via the fridge’s app and the external thermometer simultaneously to detect any seal failures.
If the temperature rises above 40 °F, increase the fridge’s power mode from ECO to MAX, as described in the EUHOMY user manual. The device’s three‑level battery protection prevents overload, but prolonged high‑mode operation will increase power draw to approximately 49 W.
For those using the Coleman Classic Series Cooler, the lid’s cup holders can hold the thermometer probe securely, keeping it out of the way of ice packs.
Record temperature readings at two‑hour intervals during the first 24 hours to establish a baseline. This data helps adjust ice pack quantities and power settings for future evacuations.
Step 6 – Secure the Unit for Transport
During an evacuation, the cooler may need to be moved repeatedly. Use the built‑in handles of the chosen cooler—such as the wide‑grip bail on the Coleman Chiller Cooler or the retractable telescoping handle on the Coleman Xtreme Rolling Cooler—to pull the unit without straining the shoulders.
Secure the cooler in the vehicle using the adjustable BackSaver strap on the Titan or the Velcro strap on the Xtreme’s lid. These straps prevent tipping when navigating uneven terrain. The Titan’s anti‑slip shoulder pad also distributes weight evenly, reducing fatigue during long walks.
If space is limited, remove the Titan’s SmartShelf to create a single large compartment, allowing the cooler to fit into tighter cargo areas. The removable hard‑body liner can also be taken out for a softer profile when needed.
Finally, place the EUHOMY fridge’s power cable in a protected conduit to avoid damage from foot traffic or accidental pulls.
Step 7 – Test the System Before an Emergency
Before relying on the temporary fridge during an actual evacuation, conduct a full‑scale test. Load the cooler with ice packs, place the EUHOMY fridge inside, and power it using the car’s 12 V outlet for at least six hours. Verify that the internal temperature remains below 40 °F and that the drain functions correctly.
Document any temperature fluctuations and adjust the insulation or ice pack placement accordingly. If the fridge draws more power than anticipated, consider a higher‑capacity battery or a portable solar panel rated for at least 100 W.
Testing also reveals any mechanical issues with lids, straps, or wheels. Address these before an emergency to avoid failure when time is critical.
Once the test is successful, store the assembled unit in an easily accessible location, such as the trunk or a designated emergency kit shelf, so it can be deployed quickly.
Tips & Pro Tips
- Use a combination of foam board and reflective insulation for the best thermal barrier; each adds roughly 6‑12 hours of cooling.
- Pre‑freeze water bottles; they act as additional ice packs and provide drinking water without melting.
- If a power source is unavailable, run the EUHOMY fridge in “MAX” mode for 30 minutes to achieve a sub‑32 °F baseline, then switch to “ECO” for maintenance.
- Keep the cooler’s exterior clean and dry to prevent mold growth during long storage periods.
- Label the power cables and adapters for rapid connection during an evacuation.
Troubleshooting
Problem: Internal temperature rises above 45 °F after 12 hours.
Solution: Check for gaps in the sealant around the reflective panels; reapply silicone sealant where needed. Verify that the EUHOMY fridge is set to the correct mode and that the power source is delivering stable 12 V.
Problem: Ice packs melt too quickly.
Solution: Increase the thickness of the ice pack layer, or add a second pack on the opposite side. Ensure the cooler’s lid is fully latched; the Titan’s Velcro strap and the Xtreme’s latch provide additional security.
Problem: Excessive condensation inside the cooler.
Solution: Use the built‑in drain on the Coleman Xtreme Rolling Cooler or open the lid briefly to allow moisture to escape. The EUHOMY fridge’s magnetic seal helps contain humidity when closed.
Conclusion
Converting a standard cooler into a temporary fridge equips individuals with a reliable cold‑storage solution during evacuations. By selecting a suitable base cooler, reinforcing insulation, integrating the EUHOMY 19QT Car Fridge, and following the step‑by‑step process, one can maintain safe temperatures for food and medication for several days. The guide balances cost‑effective products with high‑performance features, ensuring that the system works even in extreme heat.
Readers are encouraged to perform a full test run, keep the unit maintained, and adapt the configuration to their specific vehicle and family size. With proper preparation, a portable fridge can become a cornerstone of any emergency preparedness plan.
Products Mentioned in This Guide
Frequently Asked Questions
What basic steps are needed to turn a standard cooler into a temporary fridge?
Select a well‑insulated cooler, add a 12 V portable refrigerator, connect a battery or generator power source, and install a temperature monitor.
Can a cooler‑based fridge run for up to five days on battery power?
Yes, with a high‑capacity deep‑cycle battery, energy‑efficient 12 V fridge, and proper insulation, it can maintain safe temperatures for about five days.
Which cooler brand offers the best insulation for emergency refrigeration, YETI, Coleman, or Engel?
YETI typically provides the highest R‑value insulation, but Coleman and Engel are more budget‑friendly while still offering solid performance.
How do I monitor and control the temperature inside the makeshift fridge?
Use a digital temperature probe or thermostat that plugs into the 12 V fridge, allowing real‑time readings and automatic shut‑off if limits are exceeded.
Is it safe to store medication and perishable food in a cooler‑converted fridge during an evacuation?
Yes, as long as the unit maintains 35‑40 °F (2‑4 °C) and you regularly check the temperature, it safely preserves medicines and perishables.