Introduction
Renters often worry that their windows lack the structural strength to withstand high‑velocity hurricane debris. This guide explains how to create a removable reinforcement system that protects glass without violating lease agreements. The reader will learn to assess window vulnerability, apply high‑performance window film, install temporary storm panels, and seal gaps for maximum resilience. By following these steps, one can reduce the risk of glass breakage, water intrusion, and costly repairs after a storm.
What You’ll Need
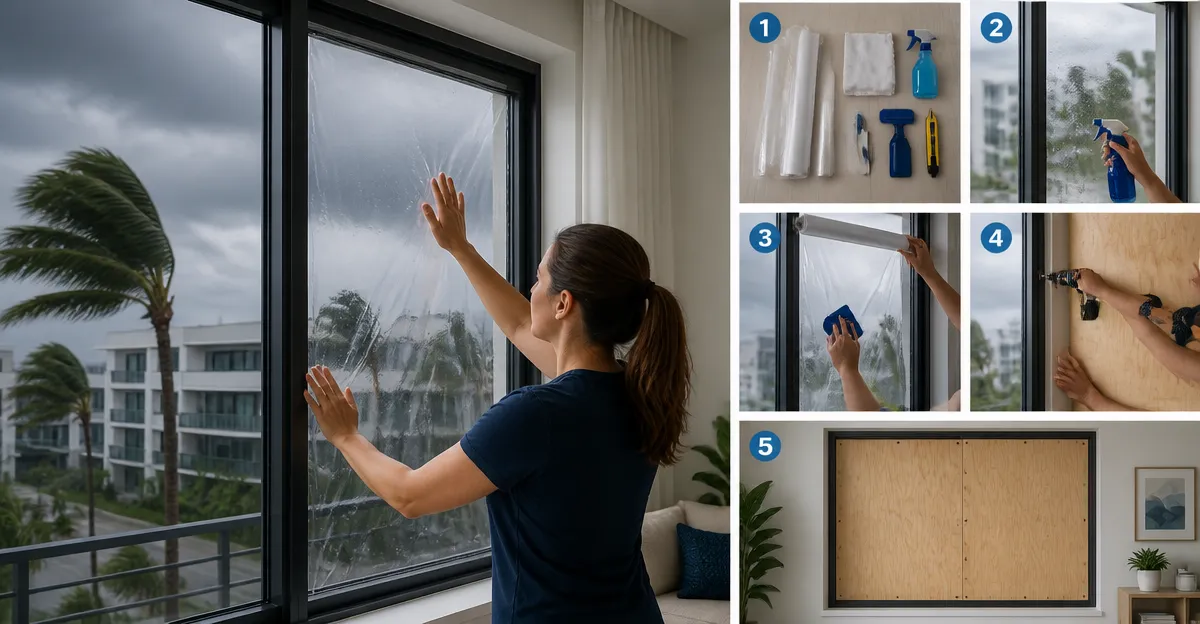
- Protective window film (e.g., KESPEN One Way Window Film)
- Measuring tape, utility knife, and straight edge
- Spray bottle filled with soapy water
- Temporary storm panel material such as 5/8„ plywood or polycarbonate sheets
- Heavy‑duty brackets or zip ties for panel attachment
- Weather‑proof caulk and a caulking gun
- Protective gloves and safety glasses
Step 1: Assess Window Types and Vulnerabilities
The first task is to identify each window that faces the prevailing storm direction. One should record the dimensions, frame material, and whether the glass is single or double pane. Single‑pane windows are most susceptible to impact and therefore require the highest level of protection. Documenting this information allows the renter to prioritize effort and allocate film and panel resources efficiently.
Next, inspect the surrounding trim for gaps, cracked sealant, or loose hardware. Any existing weakness will amplify the force of debris and should be repaired before film application. Use a flashlight to examine the interior side of the glass for micro‑cracks that may not be visible from the outside. Repairing these imperfections with clear epoxy can prevent catastrophic failure during high winds.
Step 2: Apply Protective Window Film
Window film creates a flexible barrier that holds shattered glass together, reducing the likelihood of dangerous shards. The film also blocks a substantial portion of ultraviolet radiation, which helps preserve interior furnishings. For renters, a static‑cling film is ideal because it does not require adhesives that could damage the glass or frame.
The recommended product for this step is KESPEN One Way Window Film. It blocks 90% of UV rays, reflects heat, and provides daytime privacy with a 12% visible light transmission rate. Priced at $6.99, it carries a rating of 4.1 out of 5 stars from over thirty thousand reviews, indicating strong consumer confidence. Its static‑cling design allows the renter to apply the film with a spray of water on both sides, then smooth it with a squeegee. The film can be removed without residue, satisfying most lease clauses that prohibit permanent alterations.
If a frosted aesthetic is preferred, the rabbitgoo Frosted Window Film offers a decorative white‑out look while still providing 99% UV protection. At $6.99 and a 4.3‑star rating, it is a cost‑effective alternative for bathrooms or bedroom windows where privacy is paramount. The film’s bubble‑free installation method involves cleaning the glass, spraying water, and using a credit card or squeegee to expel air pockets.
For renters who desire a mirror‑type one‑way effect, the Dwersty One Way Window Film provides 93% UV blocking and 85% infrared reduction. Priced at $5.67 with a 4.4‑star rating, it includes a backing grid that simplifies cutting to exact dimensions. The film’s static‑cling nature ensures a mess‑free installation and removal, which is essential for temporary solutions.
Finally, the Sunbaby Reeded Window Film adds a decorative lattice pattern while delivering 85% infrared and 98% UV blocking. At $7.14 and a 4.5‑star rating, it combines aesthetic appeal with functional protection. Its non‑adhesive technology makes it suitable for renters who wish to enhance interior design without compromising future move‑out conditions.
Step 3: Install Temporary Storm Panels
While window film mitigates glass fragmentation, high‑velocity projectiles can still deform the pane. Temporary storm panels provide a rigid shield that absorbs impact energy. Cut 5/8„ plywood or polycarbonate sheets to match each window’s dimensions, allowing a one‑inch overlap on all sides for secure fastening.
Attach the panels using removable brackets that screw into the window frame without penetrating the wall. Zip ties can also be used to clamp the panel to existing window trim, provided they do not damage the finish. Ensure the panel sits flush against the glass to prevent wind‑driven gaps.
After installation, seal the perimeter with a thin bead of weather‑proof caulk. This step prevents water infiltration behind the panel during heavy rain. The caulk can be removed with a utility knife after the storm season, leaving the original frame intact.
Step 4: Seal Gaps and Secure Frames
Even with film and panels, small gaps around the frame can admit wind pressure and water. Apply a continuous line of silicone caulk around the interior perimeter of each window, focusing on corners and any existing cracks. Use a caulking gun to control flow and achieve a smooth finish.
Inspect the window hardware for loose screws or hinges. Tighten all fasteners with a screwdriver to reinforce the structural integrity of the frame. If the hardware is rusted, replace it with stainless‑steel alternatives that resist corrosion in humid environments.
Finally, install interior storm shutters or heavy curtains as a secondary barrier. These items add an extra layer of protection against flying debris and can be removed after the storm without leaving marks.
Tips & Pro Tips
- Measure twice and cut once; accurate dimensions reduce waste and ensure a seamless fit for film and panels.
- Use a spray bottle with a few drops of mild dish soap; the soap reduces surface tension and helps the film glide smoothly.
- Work on a cloudy day or in a shaded area to prevent the water from evaporating too quickly, which can cause bubbles.
- Store excess film in a cool, dry place; static‑cling material can become brittle if exposed to extreme heat.
- When installing plywood panels, pre‑drill pilot holes to avoid splitting the wood.
Troubleshooting
Bubbles under film: If bubbles appear after the film has dried, gently lift the edge, re‑wet the area, and smooth it with a squeegee. Do not force the film, as this can tear the material.
Film does not adhere: Ensure the glass is completely clean and free of oil or dust. Use isopropyl alcohol to remove stubborn residues before applying water.
Panel warping: Choose marine‑grade plywood or polycarbonate sheets that resist moisture absorption. Store panels flat and avoid prolonged exposure to direct sunlight before installation.
Conclusion
Renters can significantly improve the resilience of apartment windows against hurricane debris by combining high‑quality static‑cling film with temporary storm panels and proper sealing. The steps outlined in this guide provide a practical, lease‑friendly solution that protects both occupants and interior furnishings. By investing a modest amount of time and resources, one can achieve peace of mind during the storm season and avoid costly damage after the event.
Products Mentioned in This Guide
Frequently Asked Questions
What is the most effective removable reinforcement for apartment windows during a hurricane?
Apply a high‑performance protective window film and add a temporary storm panel secured with brackets or zip ties for easy removal after the storm.
Can I install window film without violating my lease?
Yes, most films are removable and leave no residue, making them lease‑friendly when applied according to the manufacturer’s instructions.
How do I decide between 5/8" plywood and polycarbonate sheets for a storm panel?
Plywood is cheaper and strong but heavier, while polycarbonate is lighter, more impact‑resistant, and easier to handle for quick installation.
What basic tools do I need to measure and seal gaps around reinforced windows?
A measuring tape, utility knife, straight edge, spray bottle with soapy water, and a caulking gun with weather‑proof caulk are essential.
How can I attach temporary storm panels securely without damaging the window frame?
Use heavy‑duty brackets or zip ties that clamp to the window frame or surrounding trim, avoiding screws or permanent fasteners.