Introduction
This guide teaches the reader how to produce fast‑growing, nutrient‑dense sprouts that can sustain a family during emergencies. One will learn the science behind sprouting, the essential equipment, and the precise actions required to harvest edible greens within days. The value lies in the ability to create a reliable source of vitamins, minerals, and protein when conventional food supplies are disrupted.
Sprouts provide up to 40 % more nutrients than mature vegetables because the seed stores all the energy needed for rapid growth. By mastering sprouting, one gains a portable, low‑cost food system that requires only water, a container, and quality seeds.
Throughout the guide, practical product recommendations are offered to streamline the process, yet the method remains fully functional without any purchase.
What You’ll Need
- Clean glass jar or food‑grade sprouting tray
- Cheesecloth or fine mesh lid for ventilation
- Fresh, high‑quality seeds (organic, non‑GMO preferred)
- Clean water at room temperature
- Optional: a reference guide for seed selection and sprouting techniques
For convenience, the following Amazon products can serve as reliable tools:
- Saving Seeds Guide – a Kindle edition that lists 322 edible seeds and provides germination tips.
- The Sprouting Book – a paperback covering soaking, rinsing, and health benefits.
- Nature Jim’s Sprouts Organic Salad Mix – a 1 lb blend of broccoli, alfalfa, radish, and clover seeds.
- The Sprout Book – a comprehensive paperback on sprout nutrition and long‑term storage.
Step 1: Select the Right Seeds
The foundation of a successful sprout batch is seed quality. Choose seeds that are certified organic and non‑GMO to avoid contaminants. The Saving Seeds Guide offers a curated list of 322 vegetables, herbs, and fruits, explaining which varieties germinate fastest and yield the highest nutrient content. For emergency situations, prioritize fast‑growing legumes (e.g., mung beans) and microgreen mixes that reach harvest in 3‑5 days.
Why this guide? It provides concise germination timelines, storage advice, and seed‑saving techniques, reducing trial‑and‑error for novices.
Typical price: $2.99; Rating: 4.7 / 5 (1,089 reviews). This low‑cost reference is an economical investment for any preparedness kit.
Step 2: Acquire High‑Quality Sprouting Seeds
Once the seed types are identified, obtain a reliable source. The Nature Jim’s Sprouts Organic Salad Mix supplies a ready‑made blend of broccoli, alfalfa, radish, and clover seeds, all certified organic and non‑GMO. This mix is designed for rapid growth, delivering crisp sprouts in as little as five days.
Why this product? It eliminates the need to purchase separate seed packets, ensuring a balanced nutrient profile and simplifying inventory management for emergency kits.
Price: $10.46; Rating: 4.8 / 5 (7,777 reviews). Although currently unavailable, it remains a top recommendation when in stock.
Step 3: Prepare Your Growing Container
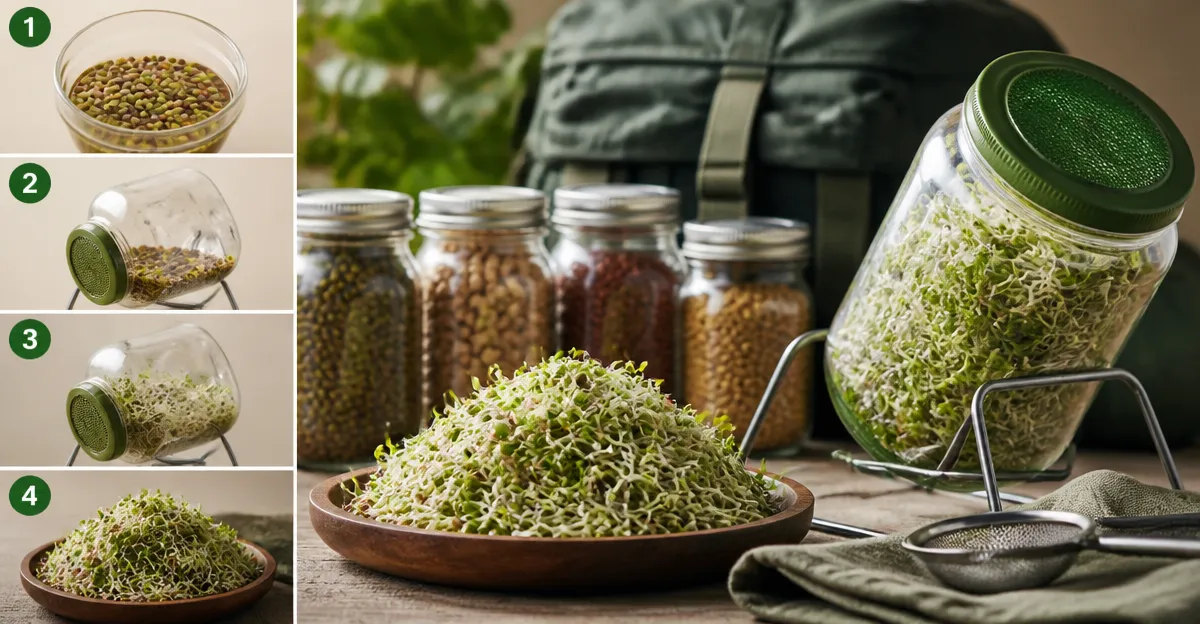
Use a wide‑mouth glass jar (approximately 1 liter) or a food‑grade sprouting tray. Place a piece of cheesecloth over the opening and secure it with a rubber band. This arrangement permits airflow while preventing seed loss.
Cleanliness is critical; sterilize the container with a dilute bleach solution (1 % concentration) and rinse thoroughly. A sanitized environment minimizes the risk of mold and bacterial contamination, which can compromise nutrition and safety.
No specific product is required for this step, but a reusable silicone lid (available separately) can further improve ventilation.
Step 4: Soak the Seeds
Measure 1–2 tablespoons of seed mix per jar. Cover the seeds with cool, filtered water, ensuring they are fully submerged. Soak for the duration recommended in the seed guide—typically 4–8 hours for alfalfa and radish, and up to 12 hours for broccoli.
The Sprouting Book provides detailed soaking schedules, explaining why different seeds require varied times to activate enzymes essential for sprout development.
Why this book? It combines scientific explanations with practical tables, allowing the user to tailor soaking periods for optimal germination speed—a crucial factor in emergency scenarios.
Price: $10.46; Rating: 4.5 / 5 (344 reviews). Its concise format makes it a handy reference during rapid preparation.
Step 5: Rinse, Drain, and Grow
After soaking, pour out the water through the cheesecloth, then rinse the seeds with fresh water. Drain thoroughly to avoid excess moisture, which can foster mold. Repeat this rinse‑drain cycle twice daily.
Place the jar at an indirect‑light location (e.g., a kitchen counter away from direct sun). Light stimulates chlorophyll formation, turning sprouts from pale white to vibrant green.
Monitor humidity; a sprouting tray with a shallow water reservoir can maintain a moist environment without waterlogging the seeds.
Step 6: Harvest and Store Your Sprouts
When sprouts reach the desired length—generally 1–2 inches—they are ready to harvest. Use a clean kitchen scissors to cut the stems just above the root base. Rinse once more, then gently pat dry with a clean towel.
For emergency storage, the Sprout Book outlines methods to dehydrate or freeze sprouts, preserving nutrients for months.
Why this resource? It offers step‑by‑step preservation techniques, ensuring that the nutritional benefits of fresh sprouts are retained even when fresh water is scarce.
Price: Not listed; Rating: 4.7 / 5 (1,787 reviews). Its authoritative authorship (Doug Evans and Dr. Joel Fuhrman) adds credibility to the preservation strategies.
Tips & Pro Tips
- Maintain a consistent temperature between 68‑75 °F (20‑24 °C) for optimal germination speed.
- Rotate the jar upside‑down once daily to promote even moisture distribution.
- If mold appears, discard the batch and start anew; mold spores can produce toxins.
- Blend different seed varieties to achieve a broader spectrum of vitamins—broccoli for sulforaphane, alfalfa for isoflavones, radish for vitamin C.
- In a power‑outage scenario, use a solar‑powered water pump or manually fill the jar with rainwater collected in a clean container.
Troubleshooting
| Problem | Possible Cause | Solution |
|---|---|---|
| Seeds do not sprout after 48 hours | Old or improperly stored seeds | Replace with fresh seeds from a reputable source; ensure they are kept in a cool, dry place. |
| Unpleasant odor | Stagnant water or bacterial growth | Increase rinsing frequency to three times daily; ensure thorough drainage. |
| Mold on surface | Excess moisture or poor airflow | Spread sprouts on a clean towel to dry; improve ventilation by using a wider jar. |
Conclusion
By following these six steps, one can reliably produce fast, nutritious sprouts that serve as an emergency food source. The guide emphasizes seed selection, proper soaking, and hygienic handling, all of which are essential for maximizing yield and safety. Incorporating the recommended Amazon tools can streamline the process, but the core methodology remains accessible to anyone with minimal supplies.
Preparedness is enhanced when sprouting becomes a routine practice, ensuring that fresh vitamins are always within reach, even when conventional supplies are disrupted.
Products Mentioned in This Guide
Frequently Asked Questions
What equipment is essential for sprouting seeds in an emergency?
A clean glass jar or food‑grade sprouting tray, a breathable lid (cheesecloth or fine mesh), and fresh water are all you need.
How long does it take to harvest nutrient‑dense sprouts?
Most fast‑growing seeds are ready to eat within 3‑7 days of soaking and rinsing.
Which seeds provide the highest nutritional boost?
Mung beans, lentils, alfalfa, and broccoli seeds are among the most vitamin‑rich and protein‑dense options.
Can I sprout without buying special kits?
Yes, a simple jar, cloth, and quality seeds are sufficient; commercial kits are only for convenience.
How do I store sprouts to keep them fresh during a crisis?
Rinse them twice daily and keep the jar refrigerated; they stay crisp for up to a week.