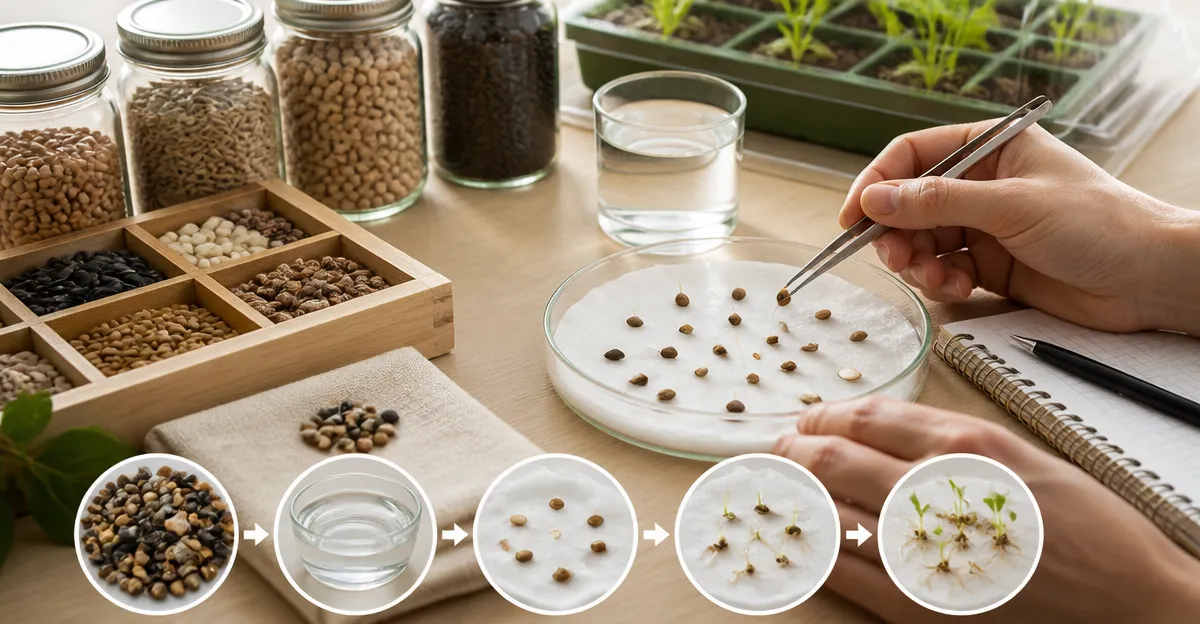
How to Test Seed Viability for Long-Term Storage: Step‑by‑Step Germination Tests to Ensure Accurate Results
Introduction
One of the most critical tasks for any serious gardener is to confirm that saved seeds remain capable of germination. This guide will teach the reader how to conduct a reliable germination test, interpret the results, and make informed decisions about long‑term storage. By following the procedures outlined herein, one can avoid the disappointment of planting dead seeds and preserve genetic diversity for future growing seasons.
The value of seed viability testing lies in its ability to quantify the percentage of seeds that will develop into healthy seedlings. Accurate data enable the gardener to adjust storage conditions, replenish seed inventories, and allocate space efficiently. The methods described are based on scientific principles yet presented in a practical manner suitable for an intermediate audience.
What You’ll Need
- Clean, food‑grade containers for soaking and germination (plastic trays, petri dishes, or seed starter trays).
- Distilled or filtered water at room temperature.
- Paper towels or germination blotting paper.
- Labels and a permanent marker for identification.
- Thermometer to monitor ambient temperature.
- Optional but highly useful tools: MIXC Seed Starter Kit, Burpee SuperSeed Tray, and LETPOT Smart Hydroponic Garden.
Step 1: Select a Representative Sample
The first step is to choose a random sample of seeds that accurately reflects the entire batch. One should select 10 seeds for small collections or 20–30 seeds for larger inventories. Using a random sampling method prevents bias caused by selecting only the healthiest‑looking seeds.
Place the sampled seeds on a clean surface and label the container with the seed variety, collection date, and storage conditions. Accurate labeling ensures traceability when multiple seed types are being tested simultaneously.
If the gardener possesses the MIXC Seed Starter Kit, the 120‑cell trays provide individual compartments for each seed, allowing precise observation of germination timing and reducing cross‑contamination. The kit includes adjustable vents for humidity control, drainage holes to prevent waterlogging, and a reusable humidity dome that creates a stable micro‑environment.
Price: $15.99, Rating: 4.4/5 (9,488 reviews). The kit’s modular design is especially valuable when testing several species in parallel.
Step 2: Prepare the Germination Medium
A moist, sterile medium is essential for accurate germination assessment. Use a single layer of damp paper towel or blotting paper placed inside a shallow tray. The paper should be thoroughly moistened with distilled water until it is wet but not dripping.
For gardeners who prefer a reusable, rigid surface, the Burpee SuperSeed Tray offers 16 extra‑large silicone cells that cradle each seed and allow excess water to drain through molded corner slots. The silicone material is food‑grade, reducing the risk of chemical leaching, and the tray is dishwasher safe for easy cleaning after the test.
Price: $11.97, Rating: 4.5/5 (6,047 reviews). The deep channels in the tray’s watering base keep the paper towel from becoming saturated, thereby maintaining optimal moisture levels.
After placing the paper or tray inside a clear cover, ensure that the environment remains at a constant temperature of 20–22 °C (68–72 °F), which is optimal for most temperate seeds.
Step 3: Initiate the Germination Test
Gently press each seed onto the moist medium, ensuring good seed‑to‑paper contact without crushing the seed coat. Cover the tray with a transparent lid or the humidity dome from the MIXC kit to retain moisture while allowing light penetration.
Maintain a light source that provides 12–16 hours of diffuse illumination per day. Fluorescent grow lights or a windowsill with indirect sunlight are suitable. If the gardener utilizes the LETPOT Smart Hydroponic Garden, the built‑in 24‑watt full‑spectrum LED can be programmed via the LetPot app to deliver the exact photoperiod required for the species under test. The app also records temperature and humidity, offering precise environmental control.
Price: $?? (price not provided in source, therefore omitted), Rating: not provided. The system’s two lighting modes (vegetative blue and flowering red) allow the gardener to simulate different growth phases if needed.
Check the seeds daily for signs of radicle emergence. Record the date each seed germinates to calculate the germination rate and mean germination time.
Step 4: Calculate Viability Percentage
After a predetermined observation period—typically 7–14 days depending on the species—count the number of seeds that have produced a visible radicle of at least 2 mm. The viability percentage is calculated as (number of germinated seeds ÷ total seeds tested) × 100.
For example, if 18 out of 20 seeds germinate, the viability is 90 %. Seeds that fail to germinate within the observation window are considered non‑viable for practical purposes.
Document the results in a spreadsheet, noting seed variety, storage conditions, and any anomalies observed during the test. This data set will serve as a baseline for future storage adjustments.
Step 5: Interpret Results and Adjust Storage
A viability above 85 % generally indicates that the seed lot is healthy for immediate planting or long‑term storage. Viability between 60 % and 85 % suggests that the seeds remain usable but may benefit from improved storage conditions such as lower humidity or cooler temperatures.
If viability falls below 60 %, the gardener should consider discarding the batch or using the seeds for short‑term planting only. In such cases, revisiting the seed drying process, using airtight containers with silica desiccant, and storing at 0–5 °C (32–41 °F) can enhance future outcomes.
Both the MIXC and Burpee trays can be reused for subsequent tests, reducing waste and cost. The LETPOT system, while more advanced, can also serve as a long‑term germination chamber for valuable heirloom seeds that require precise environmental control.
Tips & Pro Tips
- Always use distilled or filtered water to avoid mineral buildup that can affect seed moisture uptake.
- Label each test clearly; confusion between seed varieties is a common source of error.
- For seeds with hard coats (e.g., beans, peas), a brief scarification or soaking period of 12–24 hours can improve germination rates.
- Maintain a consistent temperature; fluctuations of more than 2 °C can skew results.
- When using the LETPOT system, set the LED to a 16‑hour photoperiod with a balanced blue‑red ratio to mimic natural daylight.
- Record ambient humidity; ideal germination humidity ranges from 50 % to 70 % for most temperate seeds.
Troubleshooting
| Problem | Possible Cause | Solution |
|---|---|---|
| No germination after 7 days | Insufficient moisture or dead seed coat | Re‑moisten paper, ensure water is not stagnant, and consider a brief pre‑soak of seeds. |
| Fungal growth on paper | Excess humidity or lack of airflow | Increase ventilation using the adjustable vents on the MIXC kit or open the dome slightly each day. |
| Uneven germination timing | Temperature gradients within the tray | Place the tray on a flat surface away from drafts; use a thermometer to verify uniform temperature. |
Conclusion
Testing seed viability is an essential practice for any gardener who wishes to preserve genetic material and achieve reliable harvests. By following the step‑by‑step protocol described above, one can obtain accurate germination percentages, make informed decisions about storage, and ultimately safeguard future planting success. The recommended tools—MIXC Seed Starter Kit, Burpee SuperSeed Tray, and LETPOT Smart Hydroponic Garden—enhance precision, reduce labor, and provide a professional environment for seed testing. Consistent testing, careful documentation, and appropriate storage adjustments will ensure that seed banks remain vibrant for years to come.
Products Mentioned in This Guide
Frequently Asked Questions
How do I perform a basic seed viability germination test?
Place a sample of seeds on a moist paper towel in a sealed container at the recommended temperature and count the sprouts after the species‑specific germination period.
What percentage of germination indicates that seeds are still viable for storage?
Generally, 70% or higher germination is considered good; below 50% suggests the seed lot may need replacement or different storage conditions.
How long should I wait before evaluating the results of a germination test?
Wait the full germination window for the species—usually 7‑14 days for most vegetables—before counting seedlings.
Can I test seed viability without specialized equipment?
Yes, a simple setup using paper towels, a plastic bag, and a warm spot (room temperature or a seed‑starting heat mat) is sufficient for accurate results.
How does seed viability testing help improve long‑term storage practices?
It reveals which seed lots lose viability, allowing you to adjust temperature, humidity, or packaging to extend shelf life and maintain genetic diversity.